M4 P2: WELD GEOMETRY Flashcards
Welding Joint Geometry and Symbols
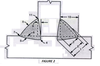
Q4-21 The weld face shown in Figure 1 is labeled:
a. 1
b. 2
c. 3
d. 6
e. 7

Q4-21 The weld face shown in Figure 1 is labeled:
B. 2

Q4-22 The weld root shown in Figure 1 is labeled:
a. 1
b. 2
c. 3
d. 6
e. 7

Q4-22 The weld root shown in Figure 1 is labeled:
E. 7

Q4-23 The type of weld shown in Figure 1 is a:
a. double-bevel-groove
b. single-bevel-groove
c. double-V-groove
d. single-V-groove
e. none of the above

Q4-23 The type of weld shown in Figure 1 is a:
D. single-V-groove

Q4-24 The weld reinforcement height shown in Figure 1 is labeled:
a. 1
b. 2
c. 3
d. 6
e. 7

Q4-24 The weld reinforcement height shown in Figure 1 is labeled:
C. 3

Q4-25 The weld toe shown in Figure 1 is labeled:
a. 1
b. 2
c. 3
d. 6
e. 7

Q4-25 The weld toe shown in Figure 1 is labeled:
A. 1

Q4-26 Number 6 shown in Figure 1 is the:
a. weld root
b. fusion face
c. groove face
d. weld interface
e. depth of fusion

Q4-26 Number 6 shown in Figure 1 is the:
D. weld interface

Q4-27 Number 5 (between arrows) shown in Figure 1 is the:
a. weld root
b. fusion face
c. groove face
d. weld interface
e. depth of fusion

Q4-27 Number 5 (between arrows) shown in Figure 1 is the:
E. depth of fusion

Q4-28 Number 4 shown in Figure 1 is the:
a. weld size
b. joint penetration
c. actual throat
d. theoretical throat
e. a and b above

Q4-28 Number 4 shown in Figure 1 is the:
E. a and b above
a. weld size
b. joint penetration

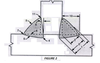
Q4-29 The weld face shown in Figure 2 is labeled:
a. 7
b. 8
c. 6
d. 11
e. 10

Q4-29 The weld face shown in Figure 2 is labeled:
B. 8

Q4-30 The weld root shown in Figure 2 is labeled:
a. 6
b. 4
c. 5
d. 9
e. 3

Q4-30 The weld root shown in Figure 2 is labeled:
B. 4
Q4-31 The welds shown in Figure 2 are:
a. concave fillets
b. conical fillets
c. convex fillets
d. T -fillets
e. fillet of fish

Q4-31 The welds shown in Figure 2 are:
C. convex fillets

Q4-32 The actual throat shown in Figure 2 is labeled:
a. 1
b. 2
c. 3
d. 10
e. 9

Q4-32 The actual throat shown in Figure 2 is labeled:
A. 1

Q4-33 The weld toe shown in Figure 2 is labeled:
a. 11
b. 8
c. 10
d. 7
e. both a and d
Q4-33 The weld toe shown in Figure 2 is labeled:
E. both a and d
a. 11
d. 7

Q4-34 Number 6 shown in Figure 2 is the:
a. weld root
b. fusion face
c. groove face
d. weld interface
e. depth of fusion

Q4-34 Number 6 shown in Figure 2 is the:
B. fusion face

Q4-35 Number 9 shown in Figure 2 is the:
a. weld root
b. fusion face
c. groove face
d. weld interface
e. depth of fusion

Q4-35 Number 9 shown in Figure 2 is the:
E. depth of fusion

Q4-36 Number 5 shown in Figure 2 is the:
a. weld root
b. fusion face
c. groove face
d. weld interface
e. depth of fusion

Q4-36 Number 5 shown in Figure 2 is the:
D. weld interface

Q4-37 Number 4 shown in Figure 2 is the:
a. weld root
b. fusion face
c. groove face
d. weld interface
e. depth of fusion

Q4-37 Number 4 shown in Figure 2 is the:
A. weld root

Q4-38 Number 2 shown in Figure 2 is the:
a. weld size
b. effective throat
c. actual throat
d. theoretical throat
e. a and b above

Q4-38 Number 2 shown in Figure 2 is the:
B. effective throat

Q4-39 Number 3 shown in Figure 2 is the:
a. weld size
b. effective throat
c. actual throat
d. theoretical throat
e. a and b above

Q4-39 Number 3 shown in Figure 2 is the:
D. theoretical throat

Q4-40 Number 10 shown in Fig re 2 is the:
a. weld size and leg size
b. weld size
c. leg
d. theoretical throat
e. actual throat

Q4-40 Number 10 shown in Fig re 2 is the:
A. weld size and leg size

Key: Q4-21 thru 40
b
e
d
c
a
d
e
e
b
b
c
a
e
b
e
d
a
b
d
a
b1
e2
d3
c4
a5
d6
e7
e8
b9
b10
c11
a12
e13
b14
e15
d16
a17
b18
d19
a20
