Complex direct restorations Flashcards
(35 cards)
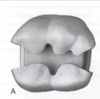
complex posterior direct restorations
used to replace any missing structure of teeth that have fractured, have extensive caries or have existing restorative material
usually replace on or more missing cusps
incidence of tooth fracture
molars are frequently presented fractures than premolars
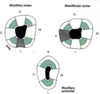
buccal cusp of maxillary molars
lingual cusp of mandibular molars
most fractured teeth had been restored on three or more surfaces
Treatment plan options
Indirect restoration - onlay/crown - teeth with crowns are less likely to recieve extensive treatment (over a 10 yr period) than are teeth with large amalgam restorations - treatment of choice
DIrect restoration - complex direc restoration - less expensive, transitional restoration
Indications for Complex direct restorations
definitive final restorations - patient financial concerns
transitional restorations - pending final treatment plan, questionable pulpal or periodontal prognosis, management of caries
Indications for complex amalgam restorations
molars
lack of cervical enamel
high caries risk/poor oral hygiene
financial concerns
no esthetic requirements
no amalgam phobia
patient requires a short appointment
reduction of weakened cusps
fracture strength increases when cusps are covered (removed or reduced)
Rules for Cusp removal
if unsupported tooth structure OR caries extension from primary groove to cusp tip (up the cusp incline) is:
1/2 the distance: NO removal is indicated
1/2 to 2/3 the distance: consider cusp removal
over 2/3 the distance: remove the cusp

Cusp Reduction
Remember amalgam needs 2.0 mm for sufficient bulk - for resistance to fracture
reduce cusps to give enough space - 2.0 mm
pulp protection
direct pulp cap - small exposure, previously asymptomatic
indirect pulp cap - less than .5 mm remaining dentin thickness
thermal protection - mostly under amalgam restorations
goal of pulp capping procedures
maintain a healthy pulp
stimulate dentin bridge formation
conditions necessary for a successful pulp cap
pulp is vital
asymptomatic pre operatively
small exposure
isolated - not contaminated with saliva
no excessive hemorrhage
the restoration is well
materials for pulp protection
MTA
calcium hydroxide
calcium silicate
glass ionomer
MTA
mineratl trioxide aggregate - same compounds as Portland cement (calcium oxide, aluminum oxide, silicone dioxide)
“bioactive” and “dentinogenic” - used in direct pulp capping procedures
advantage: reparative dentinogenesis was observed earlier than with calcium hydroxide
cover with GI or RMGI
expensive

calcium hydroxide
gold standard - direct and indirect pulp capping
placed on the exposure or pink dentin
placed only on axial or pulpal floor
soluble - must not extend to margins, wash out of material will result in open margins
low compressive strength - should be covered with GI or RMGI

calcium silicate
tricalcium silicate in a hydrophyllic monomer
stimulates hydroxy apatite and secondary dentin bridge formation
direct and indirect pulp cap
light cured
increments of no more than 1.0mm
liner not required over Theracal
Glass Ionomer/Resin Modified Glass Ionomer
Liner not a pulp therapy material
should not be used directly over the pulp or if the RDT is <.5mm
used over pulp capping materials
auto cure or light cure
can be used in a sandwich technique
fluoride release
Comparison of Pulp Capping Materials

What do we use for pulp therapy
direct or indirect pulp cap
calcium hydroxide directly over the exposure or pink dentin (<.5mm RDT)
theracal can be used instead of calcium hydroxide
axial wall or pulpal floor only
thin layer
atleast 1.0 mm from cavosurface margins
should not compromise retentive features of the preparation GI or RMGI over the calcium hydroxide. GI/RMGI not neessary over Theracal
currently under review at the dental institute
Liners
GI or RMGI should not be placed in contact with the pulp
GI or RMGI - closed sandwich (restorative material is present at all cavosurface margins, open (Gi/RMGI is exposed at cervical margins
sandwich technique is used for composite restorations
GI or RMGI can be used under amalgam restorations as a liner for thermal protection
Final Tooth Preparation
Retentive features
opposing vertical walls
coves and locks
pins
amalgam pins
opposing walls
slightly convergent
What if there are no opposing walls?
try to create proximal boxes which have converging walls
hard stained dentin - no need to remove

Slots, Coves and Locks
Slots & Coves are horizontal
Locks are vertical
Slots remove more tooth structure than pin placement
Slots do not create internal stresses in dentin
slots, coves and locks are placed in dentin, not at the DEJ
330 bur

Pins
Self threading pins come in a variety of sizes (diameters)
slightly larger than the drill
placed w/a slow spped handpiece
self threading and self shearing
placed in dentin - 2.0 mm into dentin, 1.5 - 2.0mm extends out of the dentin into the prep
2.0 mm space for the amalgam occlusal to the pin
one pin per missing line angle
3-5 mm between pins
pin hole/ pin is placed parallel to the external surface of the tooth (to avoid perferation out of the tooth)