Pr_Basics - Deck 3 / 3 Flashcards
Lynda - Premiere Pro CC 2018 Essentials the basics The flashcards are derived from my notes about the course.
keyframing -
what do you call a keyframe that maintains the existing value of the initial keyframe?
a hold keyframe
Keyframing -
What’s the keyboard shortcut to lower or increase the volume?
[or]
keyframing -
At what value do you set the ‘Mosaic’ effect’s horizontal and vertical values to cancel the effect altogether?
500
keyframing -
At what setting is the ‘Posterize’ effect cancelled out?
20
subclips - restricted and unrestricted
How do you create them?
What’s the difference?
By default, when you redefine an In and/or an Out, the original is/are deleted, but there’s a way to keep your existing In/Out
Command
- in main menu, click the ‘Clip’ menu + ‘Make Subclip…’
- In the dialog, you have the option to either leave the clip unrestricted or to restrict it.
Unrestricted mean that you can push back the boundaries of your In/Out segment, to incorporate footage from the HANDLES on either side of your In/Out segment.
What does that mean? restricted means you can only edit within the confines of your In/Out boundaries. In other words, the only action available to you is clipping your In/Out segment.

Source Monitor to Timeline:
Shortcut key?
comma
What would make importing video or audio into the timeline impossible?
The absence of pre-existing set-up. If the timeline is blank, i.e. with not even a blank sequence, then you can’t import anything from either the Project Panel or the Source Monitor.
Where can you, swiftly, establish what the peak amplitude of an audio track is?
at the bottom of the ‘Audio Gain…’ dialog.

right-click the audio track and select ‘Audio Gain…’ or hit the G key
Adjusting a entire audio track, as against just one or more audio clips on that track, is called doing…
a baseline adjustment
How to vary the volume of an audio clip 1dB at a time?
With the audio clip selected
click either [or]
Holding down Shift varies the volume 3dB at a time.
Note that varying by 3dB increases or decreases volume by half.
Also, it does not matter whether the audio clip is linked or not to its video track.

Where is the Audio Clip Mixer?
in the Source Panel.
It’s one of the tabs, top.
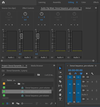
Audio Cross Dissolve - what is it?
How to?
Given two adjacent audio clips on the timeline, your intent is to smooth over any sharp volume contrast between the two.
How to:
place cursor at start of right-hand side clip; when red bracket appears, simply click.
Now: Ctrl + Shift + D
This creates a shaded area (your ACD) that spans the two adjacent clips. Widen or shorten the ACD by dragging either end of the shaded area.
Adding a keyframe to an audio clip
How?
First of all, your audio clip should display a white line in the middle of it (stretch it vertically if it doesn’t).
Now Ctrl + Click on the white line.
You’ll need at least two keyframes to vary a segment of the clip rather the entire clip.

- Why sync the audio of two AV tracks?
- How do you sync the audio of two AV tracks?
(shooting the same scene from differing distances/angles)
- to make the sound consistent across the two AV tracks, as well as to secure the best sound, by applying the sound of the AV track with the best audio to both AV tracks.
- in the Project panel, select the 2 tracks
- right-click and in the dropdown…
- …select ‘Create Multi-Camera Source Sequence’
- quick & dirty way is to select ‘Audio’, which does the job automatically. It’s very safe because Pr matches the 2 audios perfectly.
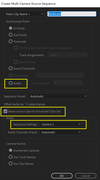
‘Camera 1’ (see pic) is whichever track you select first when selecting your two AV tracks. Make sure that ‘Camera 1’ is the track with the best audio - Pr selects the track of ‘Camera 1’ for syncing, i.e. allocating the same audio track to the pair of AV tracks to sync.
Create a sequence of a multicam clip
- how?
in Project Panel,
right-click the multicam clip
and select ‘New Sequence From Clip’ in the dropdown.
multicam sequence:
How do you create a finalised multicam sequence?
You previously converted a multicam clip in the Project Panel into a sequence in the Timeline by right-clicking it and selecting ‘New Sequence From Clip’ in the dropdown.
Now, you need to assign sections of the sequence to, say, Cam 1, others to Cam 2.
(the assumption is that you only have two cams in this instance)
The process is incredibly simple:

- In the Program Monitor, your two cams are displayed because you clicked the multicam editing button
- start playing the multicam sequence in the Timeline: the two cams play in sync
- now, you simply click on the cam that you want to display from one place on the timeline to another. Want to switch to the other? Duh! click on the other! super easy!
For learners looking at this flashcard, and to repeat what I state on the ‘question’ side, in this instance there are two cams, but there could be more.
Also: in the attached pic, there seem to be 3 pictures when there are only 2 cams. The two small pics are the actual cams, the larger one, on the right, is the leftmost cam, magnified, because that cam is currently selected!
How do you split a Cam segment in a multicam sequence on the Timeline?
Let’s assume you have two cams, by default called A Cam and B Cam by Premiere Pro CC, and you want to split an A Cam segment in the timeline into two segments, one A Cam, the other one B Cam.
- place the playhead on the spot where you want to split the Cam 1 segment
- Hit Ctrl + 2 and it’s done
- 2 means B Cam.
- A Cam is 1; B Cam is 2
- 2 means B Cam.
How to change the specs of a sequence?
- right-click the sequence in the Project Panel
- in the dropdown, select ‘Sequence Settings’
migrating only the video or only the audio from the Source Panel to the Timeline how?
drag either of the two icons just under the preview in Source panel
Move one clip in a sequence - how?
Ctrl+drag
Visually, as you start dragging the shot, a vertical line with white triangles will
appear at its left end, whether dragging to the left or to the right.

Timeline - remove stuff from -
What are the two types of removal?
What are the keyboard shortcuts?
- *LIFT** and EXTRACT
- A lift leaves a gap, an extract doesn’t.*
keyboard shortcuts:
LIFT: COLON (leaves a gap)
EXTRACT: APOSTROPHE (closes the gap)

track selectors - what are they?
See attached pic…
When you use the keyboard shortcut to migrate a clip from the Source Monitor to the Timeline, the right track needs to be selected - you don’t want B-roll to land on the A-roll track.
Track selectors are the guys to mobilise.

What is the technical term for the opening shot of a docu/film?
the establishing shot
What is rack focus?
Rack focus is when the focus moves from one plane to another.
Given two, adjacent shots in the Timeline;
what is each referred to as?
the left shot is called the A-side shot, the right shot is called the B-side shot.
Say you are trimming a shot on the Timeline;
You have the yellow bracket of the Ripple Edit tool in its place and you have the playhead on the spot where you want your trim to end.
So what’s the keyboard shorcut to delete the space between yellow bracket and playhead?
E
Given one shot in the Timeline, what is the keyboard shortcut to display it in the Source Monitor?
- *F**
- Displaying one given shot in the Source Monitor can be more convenient if the Timeline is crowded.*
Create a blank sequence - how?
In the Project Panel:
- right-click the black space left of the tree of bins
- in the dropdown: New Item / Sequence…
- ‘New Sequence’ dialog pops up
- fill specs as required
Given a string of stills of varying sizes on the Timeline,
what command will make all the stills fit in the frame size of the video?
- Selects the stills
- Right-clicks / Set to Frame Size
How do you batch-change the duration of multiple stills on the Timeline?
- Select the stills
- Ctrl + R – summons the ‘Clip Speed / Duration’ dialog
- Change duration to whatever
-
Makes sure that ‘Ripple Edit, Shifting Trailing Clips’ is ticked
- If it were not, we’d end up with gaps between stills on the Timeline
top & tail editing -
What is it and what are the commands?
t&t editing is editing stills (probably clips as well?) on the fly on the Timeline.
The commands:
- First lock the sound track, to preserve it
- Second, the playhead is over a given still
- to lop off what’s left of the playhead (the top), hit Q
- to lop off what right of the playhead (the tail), hit W
Given a clip/still on the Timeline, how do you create an In and Out coinciding with the start and end of the item?
How do you delete the In and Out?
- Playhead sits on clip
- Hit X.
To delete the In/Out, hit Alt + X.
Add transition to AV clip - how?
What are the keyboard shortcuts for adding a transition to:
- just the video clip
- just the audio clip
Click on start of clip
+ Shift + D
+ Ctrl + D
+ Ctrl + Shift + D
NOTE: given a clip that is either video or audio, Shift+D will apply.

Morph cuts -
What are they used for?
smoothing out jump cuts
In the Effect Controls tab of the Source Monitor, how can you vary the duration of a transition in terms of number of frames - say you want the transition to be 20 frames long
- click on the blue digits of duration
- dial number of frames you want.
- done.
Create a morph cut - how?
a standard transition, like Dissolve, is a single step process:
you click on a clip or a cut and apply the effect.
The Morph Cut requires a second step, viz. rendering:
- you set an In and Out on either side of the morph cut
- in main menu: Sequence / ‘Render Effects In and Out’
- DONE!
Implement the simple, ‘Black & White’, video effect - how?
- Place the Playhead over the clip you want to apply the effect to
- In the Project Panel, select the ‘Effects’ tab + locate and open the ‘Video Effects’ folder
- also open the ‘Effect Controls’ tab in the Source Monitor
- Scroll down to the ‘Image Control’ subfolder
- Select and drag the ‘Black & White’ option and drop it on the clip to modify
- The thumbnail image on the ‘Timeline’ and the preview in the ‘Program Monitor’ now display the image in B&W instead of colour
Also, the B&W effect is now listed in the ‘Effect Controls’ tab of the Source Monitor.
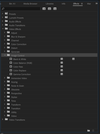
Apply a simple effect on a clip in the Timeline - how
use the B&W effect as an example.
- Place Playhead over a clip you want to apply the effect to
- In the Project Panel, select the ‘Effects’ tab + use search box to find required effect
- also open the ‘Effect Controls’ tab in the Source Monitor
- Scroll down to ‘Image Control’
- Select and drag ‘Black & White and drop on clip to modify
- The thumbnail image on the ‘Timeline’ and the preview in the ‘Program Monitor’ now display the image in B&W instead of colour
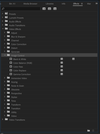
Also, the B&W effect is now listed in the ‘Effect Controls’ tab of the Source Monitor.
Keyframes…
What do you call a keyframe that maintains the value of an effect?
a hold keyframe
You have a clip in the Source Monitor and you want to go to its listing in the Project Panel - how do you do that so that you gain immediate access?
Simple: right-click on the preview in the Source Monitor and, in the dropdown, click ‘Reveal in Project’.
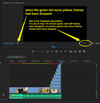
Dropped Frame Indicator -
How do you find out the exact number of frames that have been covered?
The Dropped Frame Indicator is the green dot, bottom left of the preview in the Program Monitor. When frames have been dropped, it turns yellow.
To find out the number of frames dropped, hover the cursor over the yellow dot - a blurb with the information will pop up.
What is fit-to-fill editing?
You want to change the In and the Out of a clip that’s already on the Timeline.
So, you send it back to the Source Monitor, by double-clicking and create a new In and new Out.
The procedure requires that both versions of the clip - the one in the Source Monitor as well as the one in the Timeline display an In and an Out.
The way to show an In and an Out for a clip in the Timeline is, with the playhead parked over the clip, to hit the X key
Now, in the Source Monitor you hit the ‘Overwrite’ icon and the ‘Fit Clip’ dialog appears - choose your option and OK.

Given a clip in the Timeline,
how do you display an In and an Out for that clip?
- park the playhead over the clip
- hit the X key
- done

Export a frame, whether in the Source Monitor or in the Timeline:
Ctrl + Shift + E
dialog pops up, choose a format, a path and OK.

Given a clip in the Timeline,
how do you display its duration?
immobilise the cursor over the clip and a legend will pop up with a range of information:
- file name
- start and end
- duration
To display the duration permanently, park the playhead over the clip and hit X - same as for displaying an In/Out for the clip - and the duration will be displayed in large format, bottom right of the Program Monitor.

What is the keyboard shortcut to ‘Overwrite’?
fullstop key
As seen elsewhere, you could also use the icon in the Source
Monitor - see pic.

What is a match frame and how do you perform it?
Say you want to expand a clip on the Timeline, by pushing out its In-Out boundaries, but the edit has to fit within the existing duration…
You can still expand it, but by squeezing in the longer duration (Fit-to-Fill) you will accelerate the frame rate.
Select the clip in the Timeline and hit X to display its In-Out points, as we need them for the operation.
Now you perform your match frame: hit the ‘F’ key, to display the clip in the Source Monitor, and there push back the boundaries of your In-Out as required.
Now hit the ‘Period’ key to display the ‘Fit Clip’ dialog and tick ‘Change Clip Speed (Fit to Fill)’ and OK.
So, a match frame is so called because a clip, further shortened or expanded in the Source Monitor, is made to match the one we initially put on the Timeline, and the F key is how you display the clip in the Timeline into the Source Monitor, NOT x2-click.

A clip in the Timeline has white triangles at is left and right upper corners - what does it mean?
It means this clip is integral, i.e. it does not have handles, as a result from creating an In/Out.

A clip on the Timeline is integral, i.e. does not have extra footage to it. How can we stretch or squeeze it?
the ‘Rate Stretch’ tool will do the job.
Note that squeezing a clip accelerates the action, stretching it slow down the action. And if the clip has audio, similarly voices will become highpitched on squeezing the clip, lowpitched on stretching it.

Exporting a project…
What’s the basic procedure?
- right-click sequence in Project Panel
- select ‘Export Media…’ - dialog pops up
- right off the batt, you can keep it super basic by ticking the box of ‘Match Sequence Settings’, and all the other options further down in the dialog are greyed out…
- …or you can apply a whole raft of customisations…
- ‘Publish’ allows you to post your project to a wide range of online platforms, and you can indeed log into an online account from within the dialog, and when you export, your project will be automatically uploaded.

export project…
what’s the shortcut key?
Ctrl + M
(‘Export Media…’)

NOTE:
if using using the menu dropdown, you right-click the project’s icon in the Project Panel - be AWARE that ‘Export Media’ is at the very bottom of the dropdown, which may not even show on your screen, requiring you to scroll down to display the command.
transcoding formats -
which format is said (course tutor) to be very popular?
‘Match Source - Apple ProRes 422’
Searching in the Project panel:
- Results appear as open and closed folders - what are their respective meaning?
- the folder+magnifier icon next to the search box: what is it about
The open* folders contain the keyword you entered; the closed ones don’t.

* by ‘open’ folders is meant folders that display their inner tree of files and subfolders.
About the folder+magnifier icon:
Clicking it opens the dialog shown below: you can now create search bins.
Benefit 1: your search is made permanent < > standard search.
Benefit 2: your search is more advanced: it can have two variables, with either AND or OR as logic.
What’s a handle?
given a clip with an In/Out in the Program Monitor or the Source Panel, the handles are the footage before and after the In/Out and that have been left out.
Odd word, but that’s the word.
From Source Panel to Timeline,
only migrate video or audio track - how?
- in Timeline lock the unwanted track
- hit Comma
Alternative: in the Source Panel drage, under the clip’s preview either the video or the audio icon
track selectors:
- ID them in the Timeline panel
- give an example of when you need to modify track selectors
see the attached picture.

Titles-
import a template from Essential Graphics panel - how?
just drag and drop onto lowest available video track


