Pr_Basics - Deck 1 / 3 Flashcards

Lynda - Premiere Pro CC 2018 Essentials the basics The flashcards are derived from my notes about the course.

1
Q

new project dialog:
How to avoid loss of data in the event of disk failure?

A

‘Project Auto Save’:

by default is set to ‘Same as Project’, but in case of disk crash of your laptop, having your live project saved to an external disk will preserve your work.

2
Q

the folders that hold clips in the media browser are called…?

A

bins

3
Q

import a clip into the Source Monitor
from the Project Panel - how?

A

either drag or x2click

4
Q

What is the key-based Timeline navigation system called?
(backward, pause, forward)

A

JKL

  • J is backward
  • K is pause
  • L is forward
5
Q

the names of the four screens in Pr,
clockwise, from bottom, left:

A
  • PROJECT PANEL
  • SOURCE MONITOR
  • PROGRAM MONITOR
  • TIMELINE
6
Q

How do you import a folder and its contents
(yes, including subfolders) into the Project panel?

A
  1. x2-click empty space in Project panel
  2. the ‘Import’ dialog pops up
  3. navigate to the folder and select it
  4. now click ‘Import Folder’
  5. done
7
Q

beautiful shortcut key to any display panel full screen?

A

the backtick key
- it’s below the Escape key!

8
Q

What does it mean to ‘mark a clip’

A

It simply means selecting a segment of in an original clip, leaving out the before and/or after.
Adding an In and an Out is what you’re doing.

to get to the point where to insert an In or an Out point, you can ‘scrub’ the playhead to get there.
You can, of course, use the JKL keys as well.
Not happy with an In or Out point? No sweat: move to where you want the new In/Out and hit the command again - the existing mark is replaced with the new one.

9
Q

in the ‘Timeline’ panel, what’s the keyboard shortcut to display your stuff full-width?

A

the \ key

NOTE: if you hit the \ key again,
it will revert to the previous view.

10
Q

In the Project panel, the various assets are prefixed with colour-coded squares -
What is the default colour for:

  • a sequence?
  • a video clip?
  • an audio clip?
A

NEVER MIND, I LIKE COLOURING THEM AS I PLEASE IN PREFERENCES!

11
Q

What’s transcoding and creating proxies?

A
  • Transcoding is the generic term for reducing the specs of a clip to make it easier for your computer to handle it in the editing process.
  • Proxies are the lower quality files that result from the transcoding process. Obviously, you are not changing the originals - Premiere creates proxies from the originals.
12
Q

In the Project panel, what’s the difference between duplicating and copying files?

A

When you duplicate files, the new file has the suffix ‘copy1’ added to the original name; duplicate it again and the suffix will read, er, that’s right, ‘copy2’
‘Copies’, on the other hand, have exactly the same name as originals - and can thus be a source of confusion.

NOTE: files in the Project panel are mere shortcuts, and deleting them does not affect the actual files.

13
Q

What should you do - EVERY TIME - with your sequence at the end of a work session?

A

You should duplicate it.
You should also add the date of the day’s edit to the duplicate’s name.
If you mess up your sequence in your next work session, you can always go back to your previous version!

14
Q

JKL tricks
How to:

  1. play in slow motion
  2. play one frame at a time
  3. play at increased speeds
A
  1. Hold down K, then hold down J/L
  2. Hold down K, then tap J/L
    1. very handy for navigating audio
  3. double-tapping J/L plays at double the speed
    1. further, single, taps increase speed even more.
15
Q

In / Out
add an In/Out to a clip or still on the Timeline
ONE SINGLE KEY !!!

A
  1. select clip in Timeline
  2. hit X
16
Q

In/Out creation - subclips
How to keep your original In/Out when creating a new one?

A
  1. You already have an In/Out in the Source Monitor
  2. and so you go: Menu / Clip / Make Subclip
  3. dialog pops up, prompting you to name your subclip

subclips are either unrestricted or restricted…

…unrestricted means you can drag, in the Timeline, to recover footage in the handle (i.e. outside the In/Out); restricted means that you can’t. (you can right-click and select ‘Edit Subclip’ to reverse the restriction)

  • *VISUAL CUE:**
  • *restricted** clips, on the Timeline, sport tiny white triangles at their top corners.
17
Q

In/Out creation - subclips2
What is the keyboard shortcut to create a subclip?

A

Ctrl + U

18
Q

Sequence settings -
how to change them?

A
  1. right-click the sequence in Project Panel
    1. in the dropdown, select ‘Sequence Settings’
  2. tweak settings in dialog
19
Q

Sequence -
defining the settings even before you start populating the Timeline:

A
  1. right-click in an empty space in the Project Panel
  2. New Item / Sequence
  3. ‘New Sequence’ dialog pops up
20
Q

Moving a clip from the Source Monitor to the Timeline - what is the keyboard shortcut?

A

comma

21
Q

in a sequence,
how to you move a clip around?
what needs to be enabled?
what’s the visual cue during the operation?

A

Ctrl + drag
MAKE SURE SNAPPING IS ENABLED!!!
visual cue: vertical dotted line marked with white triangles

22
Q

What is the keyboard shortcut to play a segment between an In and an Out?
(applies to both the Source Monitor and the Timeline)

A

Ctrl+Shift+Spacebar

23
Q

make the playhead snap to either end of a clip in the timeline

A

Shift + drag playhead
(You can also use the Up and Down arrows)

24
Q

Dragging a clip from the Source Panel into the Timeline and in-between two clips on the timeline -

What is the proper keyboard shortcut to avoid overwriting anything already on the Timeline?

A

Ctrl + drag

25
Q

Hovering your cursor over a video’s thumbnail causes it to play.
That action is called…

A

hoverscrub

26
Q

How do you display project settings?

A
  • in the Project Panel
    • go to the Media Browser tab
  • in the Media Browser menu bar, click the spanner icon
  • the ‘Project Settings’ dialog pops up

NOTE
Under the ‘Ingest’ dropdown you can select ‘General’, Scratch Disks as well as ‘Ingest Settings’.

27
Q

How to separate segments (clips) in the Timeline?
What’s the tool’s name and what’s the keyboard shortcut?
What’s the operation’s keyboard action?

A
  1. Track Select Forward tool (A)
  2. select clip to be moved (and all on the right of it)
  3. Alt + Right Arrow
    1. this moves things one frame at a time
    2. add Shift and it’ll be 5 frames at a time
28
Q

move one clip around in a sequence on the Timeline - how?
What’s the visual cue?
What function needs to be active?

A

Ctrl + drag

visual cue: vertical dotted line punctuated with white triangles
Make sure ‘Snap in Timeline’ (S) is on.
To move two or more tracks and leave others out, the command changes to Ctrl+Alt+drag.

29
Q

How do you close a gap in your sequence in the Timeline?

A
  1. click the gap to select it
  2. Alt + Backspace

NOTE

this operation is the same to delete one or more clips on the Timeline

30
Q

Removing a segment of clip in the Timeline:

  • What’s the two-step procedure?
  • Lift v. Extract: what’s the difference?
  • What are the keyboard shorcuts?
A

the procedure is:

  1. create an In/Out around the segment to be removed
  2. Lift or Extract - done

Keyboard shortcuts:

Lift ( ; ) leaves a gap
Extract ( ‘ ) leaves no gap

31
Q

Three-point edit - give an example.

A
  • In
  • Out
  • Overwrite (fullstop keyboard shortcut)
32
Q

remove segment of clip in Timeline without leaving gap

A

set an In and an Out for the segment of clip to be removed and hit Apostrophe (Extract)

NOTE:
the command is actually in the Program Monitor - easy to forget when you use the shortcut key, the apostrophe.
Looking at the attache image, check out the icons in the Program Monitors, which are the alternatives to the keyboard shortcuts for Extract, as well as Lift.

33
Q

Under ‘Ingest Settings’,
what does ‘Create Proxies’ do?

A

It creates lowres versions of the HD originals, so as to utilise less computer resources.

34
Q

Ripple Edit Tool:

  • What type of tool is it?
  • What is the shortcut?
  • What is its visual cue?
A
  • The Ripple Edit Tool is a ‘trim tool’.
  • The shortcut is B.
    • (Hold down the Ctrl key to access the tool on the fly.)
  • The visual cue is a yellow bracket.
35
Q

Ripple Edit Tool

What it is about the RET and the playhead?

A

The Ripple Edit Tool snaps to the playhead.
Very convenient: place the playhead where you want your trim to end, and drag you tool up to it et voila!

36
Q
  • *Ripple Edit Tool:**
  • *(micro-editing with the - )**

When the section of a clip you want to trim in the Timeline is so short that simply dragging the Ripple Edit tool would make it hard to precisely select the section to eliminate, what is the keyboard shortcut to trim one frame at a time?

A

First, let’s remind ourselves what type of editing tool the Ripple Edit Tool is: a trimming tool, i.e. it is meant to trim clips that were created with an In/Out in the Source panel prior to importing into the Timeline panel.

  1. hit B
  2. click down on the spot from where trim is to start
    1. you may want to set markers for both start and end of footage to cut
  3. Ctrl + Right arrow - to trim one frame at a time
37
Q

Ripple Edit Tool -
how to use it on the fly?

A
  1. park your cursor at the boundary between two clips on the Timeline
  2. instead of pressing B, which activates the Ripple Edit tool, hold down the Ctrl key and carry out your trim
  3. let go of Ctrl key and you’re back in default mode
38
Q

Ripple Edit Tool:

  1. What is the super-fast keyboard shortcut to perform a trim between your yellow bracket and the playhead?
  2. What is that type of edit known as?
A
  1. E
  2. an extend edit
    1. extend as in E
39
Q

Rolling Edit Tool:
Shorcut key is?
Concisely define roll editing.

A

N

Given two adjacent clips in the Timeline, the B-side’s sound starting from frame one, the transition is unpleasant. If the A-side clip has a few silent frames to spare at the end of it, we can cannibalise these, allocating them to the B-side clip:
With the ‘Rolling Edit Tool’ active, click on the boundary between the two clips and drag to the left, to cannibalise these spare, silent, frames.

40
Q

Rolling Edit Tool:
what type of editing is it and what do you need to turn off?

A

Roll trims are micro editing, and as you drag, if snapping is on, the tool will snap to edit points and markers - very annoying! - and so you’ll want to disable snapping (S).

41
Q

Rolling Edit Tool:
As you drag the tool, what happens in the Program Monitor?

A

two shots are shown:
at the outset, the A-side clip (left) previews its last image;
the B-side clip previews its first image.
In the course, tutor ends the A-side on two hands that have just tied a knot; in the B-side, a rolling pin reaches the end of a lump of dough

42
Q

Rolling Edit Tool:

What is the keyboard shortcut?
Where is the button?

A

N

The command is nested under the Ripple Edit Tool.

43
Q

Rolling Edit Tool:

How do you trim only the video or only the audio?

A

by holding down the Alt key

44
Q

a slip edit
shortcut key?
what is it?

A

Y

In a Timeline sequence, using the Slip Tool, you click on the clip to edit and you drag over the clips before or after the one whose content you want to change, without either changing the clip’s location or duration.
And so as you drag to the left or right of your clip to edit, you are, if dragging to the left, travelling back or forward outside the initial In/Out.
Obviously, what you gain on one side, you loose on the other.

Shift+Ctrl+Left/Right Arrow is another way, but in this technique, the two-pic preview (first and last frames of the clip you’re editing) is NOT available!!! indeed, the tutor doesn’t like the technique.

45
Q

What is performing a match frame?

A

In the Timeline panel, you select a clip and hit the F key.
This displays the entire original clip, with the In and Out points of the edit from the Timeline.

When you want to keep the edited clip in the same place in the Timeline panel, and with the same duration, but you want to perform, say, a slip edit, performing a match frame allows you to look at footage before and after the In and Out points, to identify the segment you want to replace the existing clip with.

46
Q

a slide edit -
shortcut key?
what’s that?

A

U

In slide editing you move a shot on the Timeline, not changing it in any way. However, as you drag over the preceding shot you are cropping it as you go; conversely, you are lengthening the crop you are dragging away from.

Now, ploughing, say, into the left shot may leave the latter so much cropped as to compromise its value. And so, you do have the option of selecting more than one shot (using good ole Shift) for you to drag.

47
Q

Razor Tool:
How to cut only video OR audio?

A

hold down Alt

48
Q

Replace Edit:
method 1/2
(longer version)

A

A shot on the Timeline shows a scene from a distance.
Having a version of the same scene from another angle and at close range, you want replace a segment of the shot in the Timeline with some of that close-up footage:

  1. Alt+C, creating a segment in the shot on the Timeline to be replaced with the some of the close range footage.
    1. Alt+C because you want to only cut the video, not the sound
  2. load the shot with the replacement segment in the Source Monitor and create an In only - NO OUT - the cut segment in the Timeline sets the duration, and therefore the Out point as well.
  3. Alt drag the preview in the Source Monitor onto the cut segment on the Timeline
  4. Done
49
Q

Replace Edit -
method 2/2
(shorter version)

A
  1. in the Timeline, cut the segment to be replaced (Alt+C to only cut the video, not the audio
  2. in the Source Monitor and the Timeline, place the playhead at the exact start point where the replacement footage is to start (in the Timeline, that’ll be the left end of the cut segment, obviously.)
  3. right-click the cut segment in the Timeline, and in the dropdown click:
    1. ‘Replace With Clip’ / ‘From Source Monitor, Match Frame’
50
Q

What command is this?
What is it used for?
How?

A

the Track Select Forward Tool
It’s used to create a gap in a sequence.

How:

  1. select the clip from where to create a gap
  2. Alt + tap the Right Arrow to move 1 frame at a time
    1. or hold down and drag
51
Q

Markers -
How do you add a marker on the ruler in the Timeline panel?
How do you summon the ‘Marker’ dialog?

A

Adding a marker:

  1. make sure nothing is selected
  2. position playhead on a spot on the ruler
  3. hit M
  4. Boom!

to view the dialog, hit M a second time.
if wanting to access the dialog later, x2-click the marker

Check out the attached screenshot to acquaint yourself with the dialog.

52
Q

Marker Panel
Yes, there is a marker panel!
Where is it?

A
  1. go to Project Panel
  2. browse through tabs to, er, ‘Markers’
  3. any markers in the Timeline will be listed
    1. NOTE!!! if anything is selected on the Timeline, no markers will be displayed
53
Q

Markers -
add a marker to a clip - not on the ruler

A

just select the clip and hit M

NOTE:
You can add a marker to the Source clip:

  1. create your marker
  2. perform a match-frame (F)
  3. in the Source Panel, the ruler displays the Marker
    1. and you can Alt+drag the marker to give it duration
54
Q

Timeline - dial in location
(Alternative to using J or L to navigate the timeline)

A

Either scrub the blue digits or click them to activate dialling.

55
Q

What is the ‘Linked Selection’ command?

A

As often as not, a video clip is ‘married’ to an audio clip.
You may want to disable a video clip but, at the same time, want to keep its audio clip active.
Hit the ‘Linked Selection’ icon to disable all linking, and now disable the video track (right-click/’Enable’)

Why use ‘Enable’ rather than the lock or the Eye icon?
With ‘Enable’, instead of neutralising an entire track, you target one or more clips.

56
Q

Audio
remove pesky channel on a single track
METHOD 1/2 - keeping the stereo configuration

A

In the Project Panel,

  1. right-click the source file / Modify / Audio Channels
  2. Dialog pops up - check att
57
Q

Audio
remove pesky channel on a single track
METHOD 2/2 - single mono

A
  1. right-click source file in Project Panel
    1. Modify / Audio Channels - dialog pops up
  2. Change ‘Clip Channel Format setting from the default ‘Stereo’ to ‘Mono’
  3. you are going for mono, and you are getting rid of one channel, and so, in ‘Number of Audio Clips’ you want to see ‘1’ (you can indeed have dual mono)
  4. in the attached screengrab, the left channel is ticked - because in this instance, the right channel was the one to get rid of
58
Q

Audio
At how many decibels (dB) should the human voice peak for overall voice sound to be right?
NOTE!‘peak’ here does not refer to shouting; it means those places in someone’s speech where there voice goes up emphasis-wise, stress-point wise. So a person’s speech peaks quite often.

A

minus 12 dB
minus 6 dB at most

(when you can, read up on dB levels theory, notably to find out about other such acceptable levels for different kinds of sounds (score, ambient noise…)

59
Q

Audio
gain & volume - what’s the difference?

A

gain is input
you adjust the level across a clip or an entire sequence
select clip or sequence and hit G for ‘Audio Gain’ dialog.

volume is output
you adjust the level of individual clips

60
Q

Audio
you’ve found out that the sound level of an entire bin of audio clips is either too high or too low; change the gain of these audio clips in one fell swoop - how?

A
  1. in the Project Panel, select the bin
  2. hit G
  3. dial in the new gain
61
Q

Audio
How to evaluate the audio levels in a clip or segment of a clip?

A
  1. set an In and an Out
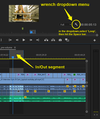
  2. click the wrench icon in the Program Monitor - in the dropdown, select ‘Loop’

the keyboard shortcut is Ctrl + L

62
Q

Audio
What’s an audio keyframe and how do you create one?

A

When you Ctrl+click on the white horizontal line in the middle of an audio clip, a white dot appears: an audio keyframe.
Drag it up or down the vary the volume.

To vary the volume of a specific segment of the clip, Ctrl+click on the spot where you want the volume to start going up or down; then, create a second dot and drag it up or down - with that second keyframe selected, you can also hit either [ or ] to lower or increase the volume.

63
Q

Audio Cross Dissolve
What does it do? How?

A

It smoothens the transition from one audio clip to the next.

  1. place the cursor on the starting point of the second track
  2. Hit Ctrl+Shift+D
  3. a greyed-out area now straddles the right end of the first clip and the left end of the right clip (see pic)
    1. You can narrow or widen the width of the ACD by dragging either end.
64
Q

What is ducking?
How do you implement it?

A

Ducking is, in most cases, reducing the sound level of the music track when dialogue is active. It is automated keyframing.
The Essential Sound panel is a quick and easy way to implement ducking: dialogue and music tracks are confirmed as such in the panel. Dialogue and Music have their respective sub-panels for tweaking.

65
Q

Audio ducking example
‘Music’ against ‘Dialogue’

A

The attached image shows both the initial ‘Essential Sound’ dialog and the box after tracks have been tagged and the ‘Music’ track is selected for treatment.
The initial panel is where you assign properties for your different types of audio track: ‘Music’, ‘Dialogue’, ‘Ambience’, ‘SFX’.
(select one track and hit the relevant category)
Having tagged all your audio tracks, when you select the music track again, the ‘Essential Sound’ dialog automatically displays the ‘Music’ section.
Now you tick ‘Ducking’ and, at ‘Duck against’, you tick the speech bubble to duck the ‘Music’ track against ‘Dialogue’ track.
Verify your music track: you’ll find that Pr has automatically created keyframes in the music track, lowering the volumes in those places where the ‘Dialogue’ is active.

66
Q

Given a video track married to an audio track:

  1. How do you know the two tracks are out of sync?
  2. How do you fix the issue?
A
  1. red and white icons appear at the start of the tracks
  2. how to fix: right-click an alert and
    1. METHOD 1/2
        • if the clips have room to move, then go for ‘Move to Sync’.
    2. METHOD 2/2
      1. if the clips are locked tight in a sequence, then go for ‘Slip into sync’.

NOTE: if you manually desync tracks, Pr does not alert you to it, assuming, as it does, that this was your intent. If you want Pr to alert you about manual desyncs, go to Preferences / Time - and tick ‘Display out of sync indicators for unlinked clips’.

67
Q

Say the audio native to your video clip is poor, but you do have a separate, high quality audio track - how do you replace the bad with the good?

A

See attached pic.
Given a video track with poor audio and an audio track with quality audio, here’s the quick and dirty method to add the external, good quality audio to the video, dumping the poor audio track on AV track:

  1. Select both of them in the Project panel
  2. Right-click and select ‘Merge Clips’ in the dropdown menu
  3. In the dialog, select ‘Audio’ and leave ‘Track Channel’ to default 1 if using the default dialog track.
  4. Tick ‘Remove Audio From AV Clip’ - doing so, you instruct Pr to overwrite the poor audio in the video track with the standalone, quality audio track.

NOTE: in the project panel, the AV track is, apparently, duplicated, but the name of the new track is suffixed with ‘-Merged’. so the original clip, with the bad audio is kept, and added to the listing is a copy, the upgraded AV track, with the now integrated quality audio.