Pr_Basics - Deck 2 / 3 Flashcards
Lynda - Premiere Pro CC 2018 Essentials the basics The flashcards are derived from my notes about the course.
Stills - setting things up, what do you do?
Even before you import stills into your Timeline, you need to import a
clip into the Timeline, that has the specs you want to apply to your project.
Doing so, sends the message to Pr that you want to use that video’s’ specs. You can delete the video clip immediately, as Pr will retain its specs.
- Preferences / Timeline
- ‘Still Image Default Duration’ - the default unit is ‘Frames’, which you can set to ‘Seconds’. The default number of frames is 150
NOTE:
As you know, the frame rate varies from one video to another, and so, if your still image duration is expressed in frames, its actual duration will be conditioned by the frame rate:
In a 24 frames/sec project still image duration = 6¼ seconds
In a 30 frames/sec project still image duration = 5 seconds
You can, of course, vary an image’s duration on the Timeline.

Stills -
given a still on the Timeline and in the Program Monitor, how do you add effects such as ‘Motion’ (Position, Scale), ‘Rotation’, ‘Opacity’ to the image?
In the Source Monitor, look for the tab called ‘Effect Controls’.

It is quite critical to work with very large images, as they give you more creative latitude. You can, notably, zoom in quite a bit, without losing definition.
Stills -
Given a very large still on the Timeline - its preview in the Program Monitor is only going to show a fraction of that still, surrounded by black space, then the blue boundary, which represents the size of the project (e.g. 1920x100).
How do you, in one single move, set that very large image to the frame size (the size of the project)?
On the Timeline,
right-click the still,
in the drop-down,
select ‘Set to Frame Size’

NOTE:
In ‘Effect Controls’, you may need to reset the positioning of the still, which may display off-centre is you have been moving it around.
Stills -
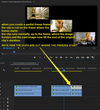
In the Program Monitor, how do you know the preview of a still fits the specs of the video precisely?
When you x2-click the preview, a blue frame appears around the image. If the blue frame hugs the image, without any black (default colour) margins, then the image is exactly the same size as the video (1920x1080 etc.).

Stills -
In the Program Monitor, how do you know an image’s specs are greater than the sequence’s?
When you x2-click the image, a blue boundary appears.
If there is black space between the image and the blue boundary, then the image’s specs are greater than the sequence’s.
Black space between image and blue frame may be just black lateral margins (pic wider that vid), black height margins (pic is higher than vid).
And of course, there may be black space all around, when pic exceeds size of video in both width and height.
NOTE: WHEN YOU DRAG THE BOUNDARIES OF THE BLUE FRAME, YOU VARY THE SIZE OF THE PREVIEW. IN THE CASE OF A SUPER LARGE IMAGE, THIS ALLOWS YOU TO ACTUALLY DISPLAY PRETTY MUCH THE ENTIRE IMAGE, EVEN IF ITS ORIGINAL SIZE IS GREATER THAN THE SEQUENCE’S BOUNDARIES.
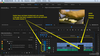
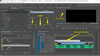
Stills -
preview in Program Monitor and Effect Controls
- just take a look at this screenshot, with legends,
to familiarise yourself with the environment.

Stills -
top and tail editing - what is it?
On the Timeline, you’re lopping off some of the front end or the back end of a still
How to:
- place the playhead where you want the lopping off to take place
- to lop off the front end, hit Q - top editing is the name
- to lop of the back end, hit W - tail editing is the name
A typical context for top and/or tail editing is when, having a music track to accompany your slideshow, you cut the individual stills to the beat.
Stills -
the black of pillar boxing is actually…transparent:
play a sequence segment where a still with pillar boxing acts as B-roll and, sure enough, the A-roll will show in lieu of the pillars.
How do you add a matte (pronounce mat), making the pillars actually black - or any colour you choose, for that matter?
- In the project panel, bottom right, click new item icon
- selects ‘Color Matte…’
- a first, small, dialog presents video settings, that displays the project settings – just click OK
- a second dialog pops up, the one in which you will set the colour to fill the columns – set your colour and click OK
- a third dialog pops up, where you only add a name to your background. As soon as that’s done, the background is listed as an item in the project panel.
- in the Timeline, move your still one level up from default B-roll track and then drag your background in-between the still and the A-roll
- make the background fit the exact footage of the still
Stills -
set up a sequence
You have dragged a range of stills onto the Timeline.
They vary in size.
What do you do in relation to frame size?
How to you batch-adjust the stills’ duration?
SET TO FRAME SIZE
- select all on the Timeline
- right-click / Set to Frame Size
BATCH-ADJUST DURATION
- select all
- Ctrl + R = ‘Clip Speed / Duration’ dialog
- scrub over blue digits or click and type
-
Makes sure that ‘Ripple Edit, Shifting Trailing Clips’ is ticked
- If it were not, we’d end up with gaps between stills on the Timeline
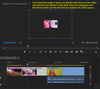
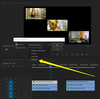
Stills -
‘Brady Bunch’ effect - how?
For the sake of illustration, 10 very short clips (looking like stills) sequentially placed on the same track in the Timeline are made to appear one after another on a (default) black canvas. They are to appear one after another, starting from top left, left to right, on several rows.
- select the second to last clips in the sequence and hit Alt + Up arrow - you can drag up manually but the shorcut is more precise/reliable
- repeat until all clips are on a different track - left-hand side of image
- drag the end bit of all tracks to coincide with the end bit of the top one - right-hand side of image
- Now scale the first clip in Effect Controls and Program Monitor. For positioning, you can drag the scaled clip to the top left of the canvas - for precision positioning, just figure out the maths.
- you can copy/paste the attributes of one clip to the next and tweak the difference as required.
NOTE
Such a series of effects is resource-hungry, and when you play back your work, frames are likely to be dropped. To avoid this:
- create an In/Out around the sequence in the Timeline
- Sequence / ‘Render In to Out’

Stills -
a composite effect can be power-hungry and, when previewed (played) in the Program Monitor, may drop frames - what do you do to produce a preview that displays without any glitches and how do you do it?
you render the section in the Timeline that is the collection of effects. rendering delivers the end product, the appearance, leaving out all the power-hungry coding, and so, being much lighter, will play without glitches.
HOW:
- in the Timeline, frame the effects with an In/Out
- In the menu: ‘Sequence’ / ‘Render In to Out’, and a dialog pops up, showing the rendering progress

transition effects -
name two common ones
What are the shortcuts?
dissolve
morph cut (used to smooth out jump cuts)
The shortcut is Shift+D
to apply to either video or audio track its Ctrl+D
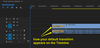
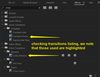
transition effects -
search for - how
- In Project Panel, select ‘Effects’ tab
- in search box, dial in ‘cross’
- a listing of video and audio transitions are listed
NOTE:
that you can set one type of transition as your default, simply by right-clicking it and selecting ‘Set Selected as Default Transition’.
Sequence Settings
How do you access them?
Menu:
Sequence / ‘Sequence Settings…’

video effects -
how to implement an effect? [B&W, tint etc.]
(quick and dirty)
- in the Project Panel, select the ‘Effects’ tab
- use the search box to locate the desired effect
- drag the effect onto the clip in the Timeline
- Done!
NOTE:
- good workflow habit is to display ‘Effect Controls’ in the Source Monitor as part of the procedure. As soon as you drop the effect onto the clip in the Timeline, the effect becomes listed in ‘Effect Controls’.
- you may wish to load an effect, to implement later; in this case, you can drag the effect from the ‘Effects’ tab in the Project Panel and into the ‘Effect Controls’ tab in the Source Monitor.
video effects -
when tweaking is needed.
Some effects are not content with just being dragged onto a clip in the Timeline - they’ll need, say, specs to be dialled in in the ‘Effect Controls’ tab in the Source Monitor.
Example: tint - how do you make it happen?
- first of all, for pure tint, you need to first convert the clip to B&W by dragging that effect onto the clip.
- this is NOT sine qua non - applying tint on colour works fine; it just looks different
- now ‘map’ the white to the required colour
- DONE!

video effects -
applying a blur using a defined area (‘Mask’) - ellipse, rectangle or pen tool are the options.
Say you want the blurring around the mask, not inside - how do you do it?
you will have imported a blur effect into the ‘Effect Controls’ tab of the Source Monitor - coming from the ‘Effects’ tab in the Project Panel - and applied some blurring under the ‘Blurriness’ command of the effect.
you will also have drawn a shape in the preview in the Program Monitor.
the blur is inside the shape by default - to apply the blur outside the shape, under the blur effect, go to:
/ Mask / Mask Expansion - and tick ‘Inverted’.

video effects -
Apply one or more of the video effects from one clip to one or more other clips
METHOD 1 / 2 - working on the Timeline
- click the clip with the effects
- Ctrl-select the effects in the ‘Effect Controls’ tab of the Source Monitor
- THEY MUST BE SELECTED IN THE LISTED ORDER !!!
- select the clip(s) you want to apply the effect(s) to
- OPTIONAL: also place the playhead on one of them, because you’ll get an immediate preview in the Program Monitor, showing how the effect(s) pan out
- Ctrl+Paste
- DONE!!!
video effects -
Apply one or more of the video effects from one clip to one or more other clips
METHOD 2 / 2 - working with ‘Paste Attributes’ dialog
- On the Timeline, select the clip with the effects
- Ctrl + C
- Select the clip(s) you want to apply the effects to
- Edit (main menu) / ‘Paste Attributes…’ (Ctrl + Alt + V)
- dialog pops up
- The dialog lists the effects and you can choose which ones to apply.
video effects -
create a preset from a set of effects - how?
- In the ‘Effect Controls’ tab of the Source Monitor select the effects destined to made into one preset
- Right-click + ‘Save Preset…’ – dialog pops up
- Name your preset – this is critical to later ID your preset in the listing of ‘Presets’ in the ‘Effects’ tab of the Project Panel. choose short + mnemonic name
- Select clips to which apply the preset
- ID your preset in the presets listing + drag and drop it over selected clips
video effects -
adjustment layer - create - how?
What are the advantages?
- Select sequence folder in Project Panel+click ‘New Item’ icon+select ‘Adjustment Layer…’ – ‘Adjustment Layer’ appears in the folder
- Drag adjustment layer onto the track above the track to modify.
- In ‘Effect Controls’, select your effects & Ctrl+cop
- Select adjustment layer+paste
ADVANTAGES
ALs can modify all or part of an entire track
given an AL with one one or multiple effects, you can modify one effect and the entire AL is updated. Also, sitting on its own track, an AL can be disabled at will.
video - effects -
How do you add a second adjustment layer to a sequence?
You don’t create a new one (as in, ‘New Item’);
you drag the existing blank in the sequence’s folder in the Project Panel onto the track above the one where there’s already an AL with effects in it.
Then, in the ‘Effect Controls’ tab of the Source Monitor, you create the effects for that second AL.
NOTE:
As stated above, the AL listed in the sequence’s folder is a BLANK, and remains so even after you have created effects in the first AL on the Timeline, and so you can keep on dragging that blank onto the Timeline, on different tracks - or onto another time period on the same track.
And so, each time you drag another copy of the blank in the Project Panel onto the Timeline, when you go to the ‘Effect Controls’ tab in the Source Monitor, no effects are listed; you got a blank slate!

video effects -
Apply effects to Master clip so that the segments created from it be upgraded with those effects, in one fell swoop. How?
The ‘Effect Controls’ tab in the Source Monitor has got two tabs of its own:
- the default, to the right, where you view the effects applied to a clip obtained by creating an In/Out in the Master and dragging that selection into the Timeline panel.
- the other, to its left, references the actual master
Into the ‘Master’ tab you can drag any effects, and they will apply instantly to every single clip on the Timeline that is derived from that master. Note!!! - in the Timeline, every affected clip is now prefixed ‘fx’, underlined in red.

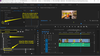
rendering
What visual cue in the Timeline alerts you that one segment is likely to drop frames in a preview?
in the actual timeline of the Timeline panel, a coloured line displays - yellow and red.
The red bits are likely not to play seamlessly.

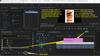
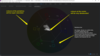
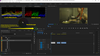
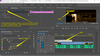
rendering
‘Dropped Frame Indicator’
The clue as to whether a RAM-hungry sequence will preview without dropping frames is, if there is a potential issue, for the timeline to display a yellow and red line - red meaning that frames are likely to get dropped.
Taking your diagnostics forward, you click the wrench icon in the Program Monitor and select ‘Dropped Frame Indicator’ -
see the dual image, attached for details.
Hovering your cursor over the now yellow dot, an info blurb pops up and, in the above case, no less than 80 frames were dropped!
Bottom right of the preview in the Program Monitor, we have the ‘Playback Resolution’, In the image on the right, it is set at ¼ the normal speed, yet still frames were dropped!
Drop the resolution to 1/8 or even 1/16 to try and obtain a preview without frame dropping.

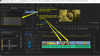
rendering
How do you render with menu options?
Clue: you can simply render selected clips or you can frame the clips with an In/Out…
Select a section that has a red line above it and, in the menu: Sequence / ‘Render Selection’.
As often as not, you’ll want frame the problem clips with In/Out points and then render.
Using In/Out, you now have two options in the menu:
‘Render Effects In to Out’
Will only render parts of the sequence that have a red line. The image on the right, shows rendering in progress using ‘Render Effects In to Out’.
‘Render In to Out’
This renders everything that’s selected, including materials under the yellow line in the Time Ruler.
However, it’s usually unnecessary to render the yellow portions, because Pr will play those sections anyway!
NOTE: TO DELETE RENDER FILES, GO TO MENU:
Sequence / ‘Delete Render Files’

freeze frames (basic) how?
***First, tell us what they are, then only how to create them.***
a clip in a sequence in the Timeline is selected and one frame in that clip is chosen for the entire clip to become that frame - in other words, you are left with a still that has the same duration as the clip it was created from.
HOW:
- park playhead over the frame that is to replace the clip
- right-click and select ‘Frame Hold Options…’
- in dialog, with ‘Hold On’ ticked, select ‘Playhead’ in dropdown
- OK
freeze frames -
How do you edit them?
- right-click the freeze frame in the Timeline (do you remember that the freeze frame was created from a frame in a clip?) and select ‘Frame Hold Options’
- untick ‘Hold On’ and the still is back to being the original clip
- place playhead over alternative frame
- right-click again and select ‘Frame Hold Options’ again
- making sure ‘Hold On’ is ticked, select ‘Playhead’ in dropdown.

freeze frames-partial
what are they and how do you create them?
A standard freeze frame is a still created from a frame in a clip and of the exact same duration as the said clip.
You can create a partial freeze frame, where the clip runs and then freezes at a given frame and then resumes its normal course.
HOW:
- playhead is parked over frame where freeze is to start
- right-click clip and select ‘Add Frame Hold’
- done
NOTE HOW IN A PARTIAL FREEZE FRAME THE CLIP GETS CUT INTO TWO PARTS, AT THE POINT WHERE THE FREEZE FRAME STARTS.
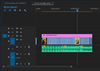
freeze frames-mini-
What are they and how do you create them?
Mini freeze frames are moments in a clip where one frame is frozen for a moment, only for the clip to resume when it ends. One way of using mini freeze frames is sync them with a musics tempo.
HOW:
- lock all tracks except the one you’re working on
- see screengrab to see what happens if you don’t
- With the playhead on the frame to freeze…
- …right-click the clip
- …in dropdown, select ‘Insert Frame Hold Segment’
As often as not, the create mini freeze frame segment will be too long - Ctrl-drag (Ripple Edit Tool) to shorten it.
fit to fill -
what is it an how do you do it?
a video clip was previously trimmed in the Source Monitor and the segment migrated to the Timeline. In the Source Monitor, you have now widened that segment, moving either or both the In and the Out, and you’re looking at shoehorning this longer segment into the duration space of the existing segment in the Timeline. With a greater number of frames, the shoehorned segment can only play at a greater speed, with the visuals moving as in an old silent movie.
HOW:
- First, ‘match-frame’ the Timeline clip to the Source Monitor - ‘F’ key.
- Edit the In and/or Out in the Source Monitor as required
- the longer the new edit, the faster the playback will be
- With existing Ins and Outs for both clips, we hit the ‘Overwrite’ icon (or the period key)
- ‘Fit Clip’ dialog pops up and we select ‘Change Clip Speed’

export a frame - how?
You can do this both in the Timeline and in the Source Monitor panels.
- Park the playhead over the frame to export
-
Ctrl + Shift + E – summons the ‘Export Frame’ dialog
- Choose a format + an export destination + OK
color correction -
- what are video scopes?
- how do you display them?
- They’re colour correction tools.
- Window / Lumetri* Scopes
* Lumetri
The Lumetri Color toolset is Premiere’s colour correction tool.
Do search for ‘color’ in the Effects tab of the Project panel to appreciate the huge range of colour tools.

color correction -
what is the value of
video black?
video white?
video black = 0
video white = 100
color correction -
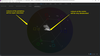
Vectorscope (YUV):
- How does the graphic look?
- What does it measure?
- Which values are nearer the centre?
- Which values are nearer the periphery?
- How many settings are there for Vectorscope?
- Where are fleshtones located on the graph?
- The graphic is circular.
- It measures colour values - saturation + or -
- at centre colours are desaturated
- at periphery colours are richly saturated
- just two - YUV and HLS
- the diagonal that goes from top left to bottom right is called the fleshtone line
- looking at the graph here, we can see that the image appears as a white cloud, just above the centre, and sitting between yellow and red. in this case, the image is leaning toward the yellow, and this would translate into an image with a yellow cast

color correction -
What is the order of the workflow?
- Waveform (Luma) – shadows, mid-tones and highlights, colours excluded.
- Are dark and black values above 0? If so, they need tweaking
- Light values should tend toward value 100
- Mid-tones – which include skin tones – sit around the equator
- Parade (RGB) – we colour-balance the channels – shadows and highlights should be colour-neutral.
- Vectorscope (YUV) - Hue-Saturation adjustments
- Fleshtones – are they aligned to the fleshtone line?
- Do we have the right saturation for colour?

colour correction -
Vectorscope (YUV)
What is it?
What does it look like?
What it is:
It displays colour values, i.e. degrees of saturation; values near the centre are very desaturated; those at the periphery super saturated.
What it looks like:
it’s a ‘polar’ diagram: a circle.
colour correction -
tweaking dark value is called?
setting the black point
Indeed, tweaking the highlights is called
setting the white point
colour correction -
using the Curves function in Lumetri Color panel to set the Black and White points
- select the White radio button at the top of the curves graph
- this white button stands for B&W
- bottom left end of the diagonal is the black point - drag it to the right to darken shadows.
- top right end of the diagonal is the white point - drag it to the left to increase exposure
- go back to LESSON 12.04 TO COMPLETE THIS CARD, BY ADDING HOW TO TWEAK FLESH TONES

colour correction -
What is the technical term for the action of dragging down shadows to the zero value?
setting the black point
Indeed, mapping the highlight values to 100 is called
setting the white point.
Also, for reference, the bottom left corner and the top right corne in the Curves graph are respectively called the black point and the white point.
colour correction -
Lumetri Color panel: how do you toggle before and after view?
you click fx, which is listed at the top of the panel

colour correction -
Shadows, Midtones and Highlights all together as known as?
tonal range
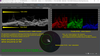
Colour correction -
what do you do it with?
what are the three views?
Colour correction is carried out with videoscopes,
of which there are three:
- Waveform (Luma) for light and dark parts
- Parade (RGB )
- Vectorscope (YUV) for hue and saturation
(the attributes in parentheses are variables)
Videoscopes -
reading the Vectorscope information:
difference between centre and periphery?
The nearer to the centre the white blob, the more desaturated the colours; the nearer to the periphery, the more saturated.
Video scopes workflow ?
-
Waveform (Luma
- shadows, midtones, highlights
-
Parade (RGB)
- to ‘colour-balance’ the RGB channels
-
Vectorscope (YUV)
- to fix Hue and Saturation - notably for fleshtones

Colour correction -
the ‘Curves’ tools in the ‘Lumetri Color’ panel
How do you read/use the graph?
Colour correction -
Shadows and Highlights must be set to 0 and 100 respectively.
What is the trades’ name for these tweaks?
setting the black point
setting the white point
Remember! in your colour correction workflow, this procedure should be the first one. (do you remember the other two, in the right order?)
colour correction -
‘Waveform (Luma)’
What is it?
What does it look like?
What it is:
The Luma setting excludes colour, as its function is to troubleshoot shadows, midtones (which include skin tones) and highlights.
What it looks like:
The complex waveform - a graphical rendering of the image - is made up of a very large number of white(ish) lines; scrubbing the playhead animates those lines that represent the bits in the clip that are moving, allowing you to ID those bits you want to tweak. This applies to the other wave graphics as well, such as Parade (RGB).
- Black elements should be at value ZERO
- White elements should be at value 100
- Flesh tone elements should be between 65 and 75

colour correction -
‘Parade (RGB)’
What is it?
What does it look like?
What it is:
RGB - red, green, blue - the three colours in digital video from which all other colours derive. In this panel, you ‘colour-balance’ each of these thrree ‘channels’.
What it looks like:
Three complex waveforms sit side and side and in this order - RGB.
colour correction -
Rectifying a colour cast - in the Parade (RGB) panel, what is the clue as to the cause of the colour cast?
What colour cast do you get when the Red or the Green or the Blue are deficient?
Red Green Blue waveforms should co-exist at the same levels. When a waveform is lower than the other two, that waveform is the cause of the imbalance, the colour cast.
- Red deficiency results in a cyan cast
- Green deficiency results in a magenta cast
- Blue deficiency results in a yellow cast
NOTE: CYAN, MAGENTA AND YELLOW ARE SECONDARY COLOURS TO RED, GREEN AND BLUE

colour correction -
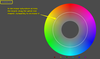
Hue Saturation Curves:
How do you increase/reduce global saturation?
In the Lumetri Color panel*, scroll down to ‘Hue Saturation Curves’
You drag the white line inward for less saturation; outward for more.
* If the panel isn’t displaying, go to the menu and click ‘Window’; in the dropdown, select ‘Lumetri Color’.
colour correction -
Hue Saturation Curves -
How to vary the saturation of one colour?
In the Lumetri Color panel*, scroll down to ‘Hue Saturation Curves’.
- click on the white line to create a point, then a second - the two points to frame the range of colour whose saturation you want to vary
- exactly between the two points, create a third one
- now drag that middle point outward or inward to vary the saturation (outward for more; inward for less).
* If the panel isn’t displaying, go to the menu and click ‘Window’; in the dropdown, select ‘Lumetri Color’.

colour correction -
Hue Saturation Curves:
How do you delete a point on the white line in the rainbow doughnut diagram?
Ctrl + click

Titles -
How to create a basic title?
- Timeline is selected
- menu: Graphics / New Layer / Text
- element appears on lowest available video track
- in the Effect Controls tab of the Source Panel has appeared:
- effect is now listed as: Text (New Text Layer)
- the effect has two sub-sections:
- ‘Source Text’ - to edit the text
- ‘Transform’ - to apply effects to the text
- the effect has two sub-sections:
- effect is now listed as: Text (New Text Layer)
- You can repeat the Graphics/New Layer/Text command to add more text boxes in the Program Monitor.
- To add graphics use the command: Graphics/New Layer and select either ‘Rectangle’ or ‘Ellipse’ - or select ‘From File…’ to import a graphic

Titles -
keyframing
with a title in the Program Monitor,
- Set a ‘Position’ keyframe and drag your title off-screen, scrubbing the blue digits to the left (automatically creates a diamond icon on Effects playhead)
- Place the play-head where you want the title to appear
- Scrubbing the blue digits to the right, bring the title on-screen (automatically creates a diamond icon on Effects playhead)
- Now place the play-head a bit further and add another keyframe – a ‘Hold’ keyframe, one that sustains the visibility of the title…
- Finally, yet further down, place the play-head where you want the title to disappear and drag the title off-screen
Titles-
how to re-use?
In Premiere, master graphics for titles must be created manually:
- Title ‘clip’ is selected in the Timeline
- In the menu: Graphics / Upgrade to Master Graphic
- Check the listing in the Project Panel:
- a ‘Graphic’ is now listed and the square next to it is purple.
- Check Effect Controls in the Source Monitor:
- There’s now a second tab, called ‘Master Graphic’ – that’s where you need to go to change any settings.
- Check the listing in the Project Panel:
- You may consider cloning your master graphic and give a back-up name to the clone – the clone can be used to create an alternative version of the title – for instance without graphics – and used elsewhere in the sequence.
Titles
Graphics Titler - how to summon it?
in the menu:
Graphics / New Layer / Text
Titles-
Essential Graphics panel - what is it?
Menu / Window / Essential Graphics
the Essential Graphics panel sports most of the functions you can see in the Effect Controls tab of the Source Monitor.
Three views are shown in the screengrabs: the first and second show that an effect needs to be selected for commands to be displayed; the third screengrab shows a listing of templates, revealed when you first click ‘Browse’, then carry out a search in the search box.
Perhaps the most salient difference is the ‘Browse’ tab, which is your gateway to collections of templates for various titles. For instance, several ‘lower third’ titles are available.

Titles-
lower third - what is it?
Lower third is video editing jargon for a blurb, usually with a graphic background, near the bottom of the screen. A typical example of lower third content is the name and role of a speaker currently displayed.

Titles-
Essential Graphics panel - how do you open it?
Menu / Window / Essential Graphics
