Basic Surgical Technique Flashcards
basic principles of oral surgery
- Risk assessment
- Good planning
- Medical history – anticoagulant med
- Aseptic techniques
- Minimal trauma to hard and soft tissues
environment for oral surgery
- Cross infection control
- Theatre environment not required – aspects of – light, PPE
All surgical procedures should be performed efficiently, using an aseptic technique and minimizing the trauma to the soft and hard tissues.
The surgeon should plan the stages of surgery before embarking upon the procedure
what is required before undertaking oral surgery
radiographic assessment
stages of surgery
- Consent
- Surgical Pause/Safety Checklist – Right pt, Right side, Right tooth
- Anaesthesia
- Access
- Bone removal as necessary
- Tooth division as necessary
- Debridement/Wound Management
- Suture
- Achieve haemostasis
- Post-operative instructions
- Post-operative medication
- Follow-up
consent
- GDC Standard 3
- Obtain valid consent
- 3.1.6 You must obtain written consent where treatment involves conscious sedation or general anesthetic
- Obtain valid consent
Procedure – risks and benefits written on, discuss with pt to ensure understanding and get them to sign
surgical safety checklist

when does LA occur in surgery
First step of carrying on surgery – anesthesia at site of surgery
surgical access
- Maximal access with minimal trauma
- Bigger flaps heal just as quickly as smaller ones
- Mucoperiosteum flap at site of surgery common
- Preserve adjacent soft tissues – handle appropriately with instruments
- Consider post operative aesthetics – where are incisions with regards to scars and healing
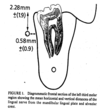
mucoperiosteum flap
Raise mucosa and periosteum as one – ensure periosteum lifted away from bone with mucosua
- Wide-based incision-circulation/perfusion
- Use scalpel in one firm continuous stroke
- No sharp angles
- Adequate sized flap
- Flap reflection should be down to bone and done cleanly
- Minimise trauma to dental papillae
- No crushing
- Keep tissues moist
- Ensure that flap margins and sutures will lie on sound bone
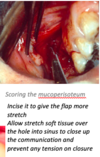
- Make sure wounds are not closed under tension
- Aim for healing by primary intention to minimize scarring
- more scarring with secondary intention - REVISE

flap types
- 3 sided flap
- envelope flap
different flaps for different procedures
3 sided flap
- Distal relieving incision
- Crevicular incision around tooth
- Mesial relieving between 7 and 8

envelope flap
- Similar to 3 sided but don’t have mesial relieving incision
- Crevicular incision extends further to midpoint of 7 or mesial 7/distal 6

soft tissue retraction
lift flap once made
- Access to operative field
- Protection of soft tissues and minimise damage
- Flap design facilitates retraction
- Howarth’s periosteal elevator or rake retractor
- Narrower
- Help reflect flap whilst protecting adjacent structures e.g. nerves
- Narrower
- Should be done with care
Henry rake retractor is a broad instrument that will reflect light in

bone removal and tooth division
- Electrical straight handpiece with saline or sterile water-cooled bur
- Air driven handpieces may lead to surgical emphysema
- Round or fissure tungsten carbide burs
- Protection of soft tissues
motor with straight handpiece for surgical procedures

sugrical emphysema
Build-up of air or gas submucosa/subcutaneous due to use of air driven handpiece in surgical procedure
- Can need hospital care and antibiotics after draining
lots of air in area can be risk of damage to area – eye here
Buccal gutter around lower 8 – allow elevation, removal of crown, spitting roots

tooth division
Once removed the bone may need to split roots, take crown of tooth
Buccal gutter around lower 8 – allow elevation, removal of crown, spitting roots

elevators
deliver roots or teeth

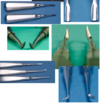
couplands (1, 2, 3 - increase in width)
cryers
warwick james (straight and curved)
principle of elevators use
- Mechanical advantage
- Avoid excessive force
- Support the instrument to avoid injury to the patient should the instrument slip
- Ensure applied force is direct away from major structures eg. antrum, ID canal, mental nerve (force directly coronally away from imp structures)
- Always use elevators under direct vision
- Never use an adjacent tooth as a fulcrum unless it too is to be extracted
- Keep elevators sharp and in good shape. Discard if blunt or bent.
- Establish an effective and logical point of application
- Careful debridement after the use of elevators to remove any bone fragments that have been created

uses of elevators (6)
- To provide a point of application for forceps
- To extract a tooth without the use of forceps
- Removal of retained roots
- To loosed teeth prior to using forceps
- Removal of multiple root stumps
- Removal of root apices

mechanics of elevator use
- Three basic actions
- Wheel and axle
- Rotate wrist while elevating the tooth to allow point of instrument to engage into tooth
- Wedge
- Lever
- Risk fracture – avoid
- Wheel and axle
All three actions can be used in combination with each other.
- Must avoid excessive force
The points of application of elevators includes:
mesial, buccal, distal, superior (upper teeth), mesial/buccal alternately, inferior (lower teeth).

debridement methods (3)
- Physical
- Bone file or handpiece to remove sharp bony edges
- Mitchell’s trimmer or Victoria curette to remove soft tissue debris
- Irrigation
- Sterile water or saline into socket and under flap
- Suction
- Aspirate under flap to remove debris
- Check socket for retained apices etc

suturing aims (5)
Approximate tissues
Compress blood vessels
- Aims
- Reposition tissues
- Cover bone
- Prevent wound breakdown
- Achieve haemostasis
- Encourage healing by primary intention
suture types
absorbable
non-absorbable
monofilament
polyfilament
absorbable sutures
- Holds tissue edges together temporarily
- Composed synthetic polyester – glyclide and lactide
- If removal of suture not possible/desirable
- Vicryl-breakdown via absorption of water into filaments causes polymer to degrade
- may mean review not required

non-absorbable suture
- If extended retention periods are required – need support or pack placed for few days
- Must be removed postoperatively
- Closure of OAF or exposure of canine tooth

monofilament sutures
- Single strand
- Pass easily through tissue
- Resistant to bacterial colonisation – one material rather than lots

polyfilament sutures
- Several filaments twisted together
- Easier to handle
- Prone to wicking
- Oral fluids and bacteria move along the length of the suture and can results in infection – theoretical consideration

suture needles
- Shapes
- ½ round is half the circumference of a circle, 3/8 also used in oral surgery
- Sizes and length
- Various
- Cross section
- Triangular
- Tip of triangle on inside-(cutting)
- Tip of triangle on outside-(reverse cutting)
- Round (Taper)
- Cutting is on point, needle passes through tissue by tissue stretch/dilation
- Friable tissues – triangle needles will break through the tissue when tie off
- Triangular

holding a suture needle
Grab 1/3 from swaged end (needle to suture material) with needle holders

what does suturing depend on
flap created
suture placement comes with experience
sutures for removal of lower 8 with 3 sided flap
Removing lower right 8
- Sutures orange
- Bites into tissue in blue dots
Suture across distal relieving incision and 2 across mesial relieving incision
OR
1 Suture on distal relieving incision and 1 on mesial relieving incision and 1 distal to the

sutures needed for removal of lower 8 with envelope flap
1 suture distal to 7 and 1 on distal relieving incision

haemostasis
peri-operative
aid vision and access and prevent blood loss
- LA with vasoconstrictor
- Artery forceps if large enough vessel
- Diathermy – cauterise??
- Bone wax – bleeding from bone, seals holes in bone to stop bleeding
haemostasis
post-operative
- Pressure
- LA infilatration
- Diathermy
- WHVP
- Surgicel – oxidised cellulose, gauze to help form clot
- Sutures
post op medication
don’t routinely give antibiotics after surgery now
- only give AB or other prescription in few cases
analgesia for pain– get them to buy them to reduce cost on NHS
follow up for oral surgery
e.g. assess pt, remove stitches
what can be used for helping to plan oral surgery
Clinical Picture
Radiograph
use in conjunction with clinical findings to plan
what to plan iin advance of surgical appointment
- What flap would you take and why?
- Where would you remove bone
- How would you elevate the root?
- What would you do next?
- Would you suture the wound and how? Type?
- What post op instructions would you give?
- Would you give post op medications?
4 nerves that could be damaged in surfery to lower 3rd molars
- Lingual*
- Inferior alveolar*
- Mylohyoid
- Buccal
Damage to the inferior alveolar nerve may be predicted
Know average position – cannot see soft tissue on radiographs

lingual nerve
location?
when at risk?
- Nerve is above lingual plate in 15-18% of cases
- At risk
- Incision of flap
- Raising of buccal and lingual flaps
- Retraction of flap
- Bone removal
- Extraction with forceps

surgical removal of lower 3rd molars
possible post op medications
- Analgesia
- Ibuprofen
- Paracetemol or Co-codamol (stop paracetamol if starting co-codamol)
- Other
- Chlorhexidine
- Antibiotics not routinely required
9 potential complications of lower third molar surgery
- Pain
- Swelling
- Bruising
- Bleeding
- Trismus
- Infection
- Dry Socket
- Paraesthesia/anaesthesia-lip/chin +/-tongue on temporary or permanent basis
- Consent form – use words the patient understands
excision of mucocele
soft tissue procedure to remove sac of saliva (no flap), created due to trauma or damage to salivary gland, usually lower lip

OAF repair
Communication into sinus by an epithelial lined tract, following removal upper molar

why would you score the mucoperiosteum
- Incise it to give the flap more stretch*
- Allow stretch soft tissue over the hole into sinus to close up the communication and prevent any tension on closure*

peri-radicular surgery
- Establish a root seal at the apex of a tooth or at the point of perforation of a lateral perforation
- To remove existing infection
- Curettage, enucleation of cyst
- Removal of apical part of root which may have infected
restorative dentistry more now than oral surgery
3 flap designs for peri-radicular surgery
- Semi-lunar (old)
- Reduced access
- Only good for apical lesions
- Scarring
- Dysaesthesia as transecting nerve fibres
- Less gingival recession
- Triangular (2-sided)
- Rectangular (3-sided)

bone removal in peri-radicular surgery
- Depends on extent of lesion
- Try to be conservative and still allow access

removal of apex in peri-radicular surgery
- Remove 3mm
- Minimal angle to allow visualisation
- Try to keep cut at right angles to root to minimise surface area
- Allows curettage

root end preparation in peri-radicular surgery
- Ultrasonic
- Cleans canal
- Creates 3mm preparation within canal
- Removes contaminated root filling
- Bur
- preparation usually out with confines of canal

3 retrograde seals
- amalgam (historical)
- Zinc oxide/eugenol
- mineral trioxide aggregate (MTA)
zinc oxide/eugenol
as retrograde seal
- Cheap
- Easy to use
- Radiopaque
- Bacteriostatic
- Sensitive to moisture
- May resorb
- Doesn’t promote cementogenesis
mineral trioxide aggregate (MTA)
as retrograde seal
- Moisture resistant
- Promotes cementogenesis
- Very good seal
- Expensive
- Long setting time
- Difficult to use
wound closure in peri-radicular surgery
- Resorbable or non-resorbable sutures
- 4.0
- Replace papillae first
- Then relieving incision

post op drugs and instructions
for peri-radicular surgery
- Standard post-op instructions
- Review and ROS at one week (removal of sutures)
- Post op radiographs between 1-6 weeks
- Further review 3-6 months later
reasons for failure of peri-radicular surgery
- Inadequate seal
- Extra root or bifid root
- Too little apex removed (“finning”)
- Seal of incorrect shape
- Lateral perforation problem
- Displacement of seal
- Lateral canals
- Inadequate support
- Periodontal pockets,
- Occlusal overload,
- Excessive root resection
- Split roots
- Soft Tissue defect over apex post-op