Livestock Judging Terminology Flashcards

Round

Loin
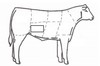
Flank

Chuck

Brisket

Plate

Rib
Identify #1
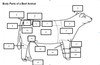
Tailhead
Identify #2

Hip Bone (Hooks)
Identify #3

Poll
Identify #4

Pin Bone
Identify #5

Rump
Identify #6

Loin
Identify #7

Back
Identify #8

Neck
Identify #9

Shoulder
Identify #10

Round (Quarter)
Identify #11

Side (Ribs)
Identify #12

Stifle
Identify #13

Hock
Identify #14

Flank
Identify #15

Pastern
Identify #16

Forearm
Identify #17

Brisket
Identify #18

Knee
Identify #19

Cannon Bone
Leg Position - Identify #1

Correct
Leg Position - Identify #2

Bowlegged
Leg Position - Identify #3

Knock-Kneed
Leg Position - Identify #4

Splayfooted (toed out)
Leg Position - Identify #5

Pigeon-Toed (toed in)
Leg Position - Identify #6
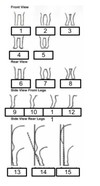
Correct
Leg Position - Identify #7

Bowlegged
Leg Position - Identify #8

Cow-hocked
Leg Position - Identify #9

Correct
Leg Position - Identify #10

Buck-Kneed
Leg Position - Identify #11

Calf-Kneed
Leg Position - Identify #12

Weak Pasterns
Leg Position - Identify #13

Correct
Leg Position - Identify #14

Sickle-hocked
Leg Position - Identify #15

Post-Legged
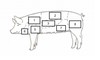
Swine - Identify #1

Neck
Swine - Identify #2

Hip
Swine - Identify #3

Snout
Swine - Identify #4

Shoulder Blade
Swine - Identify #5

Ribs
Swine - Identify #6

Flank
Swine - Identify #7

Ham
Swine - Identify #8
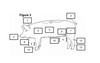
Jowl
Swine - Identify #9

Knee
Swine - Identify #10

Underline
Swine - Identify #11

Stifle
Swine - Identify #12

Hock
Swine - Identify #13

Dewclaw
Swine - Identify #14

Pastern
Swine Body Parts - Identify #1

Boston Shoulder
Swine Body Parts - Identify #2
Loin
Swine Body Parts - Identify #3

Spareribs
Swine Body Parts - Identify #5

Picnic
Swine Body Parts - Identify #6

Jowl
Swine Body Parts - Identify #7

Belly
Swine Body Parts - Identify #8

Ham
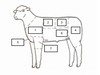
Sheep - Identify #1

Poll
Sheep - Identify #2

Rack
Sheep - Identify #3

Loin
Sheep - Identify #4

Rump
Sheep - Identify #5

Dock
Sheep - Identify #6

Neck
Sheep - Identify #7

Shoulder
Sheep - Identify #8

Ribs
Sheep - Identify #9

Leg
Sheep - Identify #10

Breast
Sheep - Identify #11

Flank
Sheep - Identify #12

Stifle
Sheep - Identify #13

Knee
Sheep - Identify #14

Hock
Sheep - Identify #15
Pastern
Sheep Carcass - Identify #1

Shoulder
Sheep Carcass - Identify #2

Rack
Sheep Carcass - Identify #3
Loin
Sheep Carcass - Identify #4

Leg
Sheep Carcass - Identify #5

Breast
Sheep Carcass - Identify #6

Flank
Sheep Carcass - Identify #7

Shank
Goat Carcass - Identify #1

Leg
Goat Carcass - Identify #2
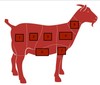
Loin
Goat Carcass - Identify #3

Rib
Goat Carcass - Identify #4

Shoulder
Goat Carcass - Identify #5

Neck
Goat Carcass - Identify #6

Breast
Goat Carcass - Identify #7

Shank
